Go to Settings > Site Settings > Users. There you can add as many users as you need. All users will have full rights.
Once added, the new user will receive an email with a link to validate their account and set their password.
Go to Settings > Site Settings > Users. There you can add as many users as you need. All users will have full rights.
Once added, the new user will receive an email with a link to validate their account and set their password.
Birthdate is required when you have Age Based lists. If we do not have an age, we would not know which list to put that person on.
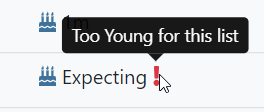
If the parents have a due date, put that as the birthdate. You can update it when the child is born.
If they do not yet have a due date, you can check the “Trying” checkbox. This will put them on the youngest list on your account. If you do not have a Trying checkbox, go to Settings > Site Settings > Site Details and check the “Show Trying Checkbox” setting.
On the list, these children will have a birthdate of “Expecting”. You’ll also notice they have a red exclamation mark next to their name indicating they are too young for the list. This icon will also appear if a child’s due date in is the future, or your lists start at a later age then the child is.
One of the most important parts of setup is creating your list(s). You have to decide how many lists you need, what type of lists they are, and how they should be sorted. In this article we’ll help you get them setup.
Go to Settings > Manage Lists or click on the Manage Lists button on the home page. Once on the Manage Lists page, click on Edit Lists to make changes. Depending on the options you chose in the setup wizard and any further changes, you’ll see something like this:
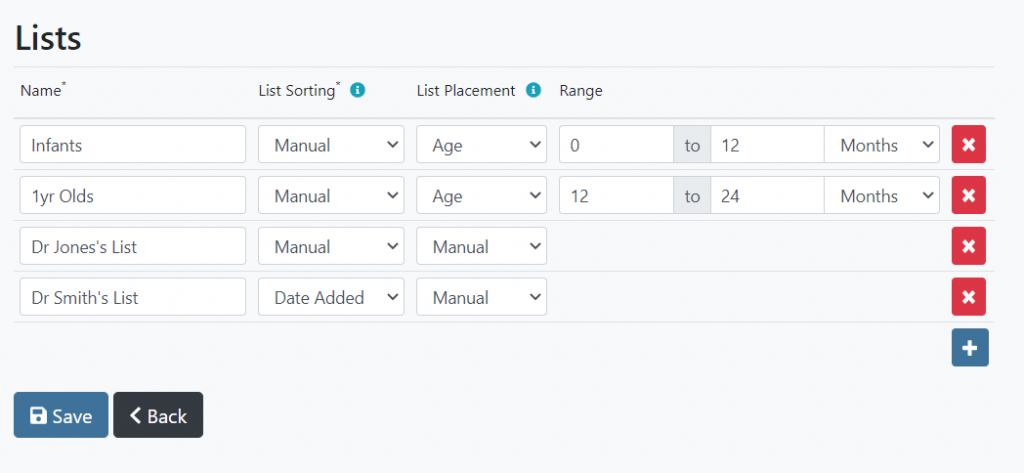
Used to identify the list. It must be unique.
If you have chose Age or Birthdate as your list placement type, you will need to specify a start and end to the range for this list.
We have a small but dedicated and very knowledgeable support team to assist you. If you can’t find the answer to your questions here on our help site, please contact us at one of the methods below.
The best way to reach us is via email. Email is just a better way to support software. We can provide step by step instructions, screen shots, and even links to detailed articles here on our help site. Our support email is support@waitlistplus.com. If you send it during our normal business hours, we usually reply within a few hours.
If correspondence via email is not providing the assistance you need, call us at 1-608-466-2851. Expect a call back within 24 to 48 business hours.
We are based in the great state of Wisconsin, USA. Our time zone is Central (CST/CDT) and we are typically available Monday-Friday from 9am to 4pm.
We follow all HIPAA guidelines, and will sign a BAA if needed. Please contact support if you would like to review our BAA.
We take all the necessary precautions to secure your customer’s data. For more information, please review our policies: https://www.waitlistplus.com/Security
When your time runs out your trial will cancel automatically. There is nothing you need to do.
If you have paid for a subscription already and you want to cancel, you can go to Settings > Site Settings > Subscription and click on Cancel Subscription. Your access will expire when your paid period ends.
If the format of dates are not correct (e.g. MM/DD/YY instead of DD/MM/YY) you can change your account’s locale. When you signup this is set to match your browser’s locale setting, but if it’s still not correct, you can change it in the Site Settings page.
WaitlistPlus does not have the functionality to directly charge a fee to your customers when they sign up on your waitlist. This is a fairly common need though and some customers have came up with solutions that allow them to accomplish this with help from WaitlistPlus
You can use the custom form fields within WaitlistPlus to keep track of who’s paid the fee. This field could hold a transaction/confirmation number that you could look up to verify, or just a flag that only you can view and set.
You can use the Special Instructions in your Customer Signup Form that instruct your customers to submit payment via Paypal/Venmo/etc, and then put the payment confirmation number in the customer form field you created.
Maybe… dealing with money is complicated. Payments, refunds, chargebacks, fraud, fees. We keep our subscription fees low by keeping our software simple. Feel free to send us your feedback on this feature, we often add features when many customers request them.
Welcome to WordPress. This is your first post. Edit or delete it, then start writing! test