
Create lists to group applicants by age, school-year birthdate, program, or service. Choose how people join each list and how they are ordered within it. You need Admin access to change list settings.
Open the list editor
- Check the site name at the top of the staff app.
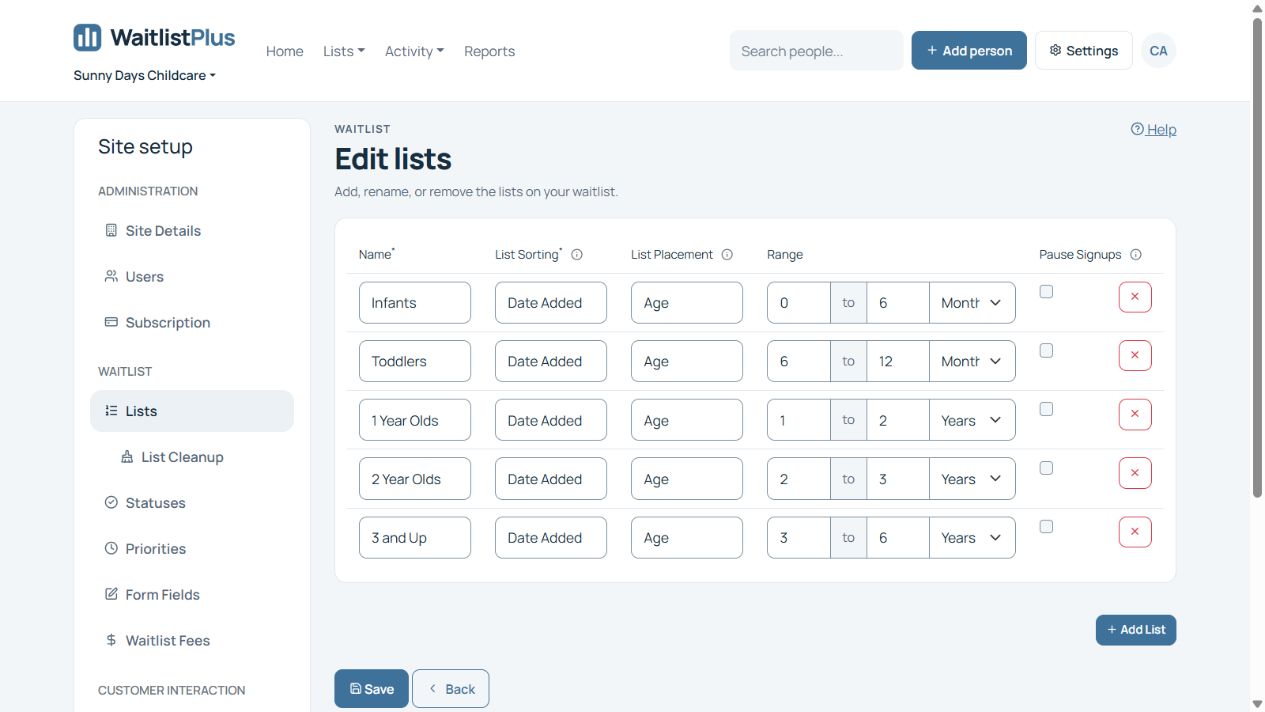
- Go to Settings > Lists and click Edit Lists. You can also open the Lists settings page using Manage Lists on the dashboard.
- Click Add List to create a row, or edit an existing row.
- Give each list a unique name, choose sorting and placement, and enter a range if required.
- Review all related rows together, then click Save. Open the lists afterward to check the result.
On smaller screens, open the main menu to reach Settings and expand the settings navigation if needed. If people are already on your lists, read Changing List Settings before changing ranges, deleting list rows, or converting placement.
Sorting and placement are different
| Setting | Question it answers | Choices |
|---|---|---|
| List Sorting | In what order do people appear within this list? | Date Added or Manual |
| List Placement | Which list does a person belong to? | Age, Birthdate, or Manual |
The word Manual appears in both settings, but each has a separate purpose. For example, an Infants list can use Age placement so children join and move automatically, plus Manual sorting so staff can arrange the order within that list.
Choose list sorting
- Date Added: uses the membership’s Date Added for date-based ordering. Review any priorities configured on your site when checking a person’s position.
- Manual: starts with Date Added ordering but lets staff move people within the list by dragging them. This does not change which list the person belongs to.
When you change sorting to Date Added and save, positions are recalculated using Date Added and priority. Check the resulting order rather than expecting previous manually assigned positions to remain unchanged.
Date Added belongs to the membership. Requested Start Date records when the applicant would like to start; it is not the birthdate used for age-based placement. See Manage a person’s place on a list for dates, moving a person, and manual ordering.
Choose list placement
- Age: automatically assigns people using their birthdate and the age ranges you define. As children age, the app moves them into the appropriate age group nightly.
- Birthdate: automatically assigns people using a fixed birthdate range, such as a school-year group. Unlike Age placement, the range is defined by calendar birthdates.
- Manual: requires the appropriate list to be selected when someone is added. Staff manage moves when needed.
You cannot mix Age and Birthdate placement in the same site. You can combine Manual lists with either Age or Birthdate placement. For classrooms that need different approaches, see combining automatic placement and manual classes.
Set ranges without gaps or overlap
Age ranges can use Days, Weeks, Months, or Years. Review all automatically placed lists as a set: each person within the configured span should have one automatic destination, and adjacent ranges must meet without gaps.
The minimum is included; the maximum is excluded. For example, a child exactly six months old belongs in the 6–12 Months list, not the 0–6 Months list. Birthdate ranges follow the same minimum-inclusive, maximum-exclusive rule.
| Example age-based list | Range entered in the editor | Who belongs here |
|---|---|---|
| Infants | 0 to 6 Months | From birth until, but not including, six months old |
| Toddlers | 6 to 12 Months | At least six months old, but under 12 months old |
List setup requires contiguous automatic-placement ranges with no gaps. Use the previous list’s maximum as the next list’s minimum, and keep the intended full span covered. A person who exceeds every configured range is removed from active list membership; their person record remains available in search.
Use the correct birthdate or known due date for automatic placement. If no due date is known and your site permits it, use Trying; see birthdates on age-based lists. Age placement uses birthdate and age, not Requested Start Date.
Pause online signups for one list
Check Pause Signups on a list’s row and click Save when you want to stop new customer signups for that list temporarily. This does not delete the list or remove existing people.
- Customers cannot join that paused list through the online signup form.
- Authorized staff can still add people to it.
- Children can still move into it through automatic age-based placement.
Pausing one list is different from turning off the entire signup form using Settings > Customer Signup Form > Active. To customize what customers see while signup is unavailable, edit Message When Not Available on that page. See Customer Signup Form.
Next steps
- Add a person or family and check the assigned list.
- Manage classes or locations in the same age range.
- Change ranges or convert existing lists.
How do you set a max occupancy for each list?
There is no way to set a max number of people on a list.