
Let customers join your waitlist through a public form without creating an account. Configure it in the staff app, then share the appropriate signup link on your website or in customer communications. You need Admin access to change the settings.
The public signup link starts a new signup. A family’s unique customer portal link shows their saved family and memberships. Share the public signup link for new applicants; use the private portal link for an existing family. See Set up and share the customer portal.
Configure the signup form
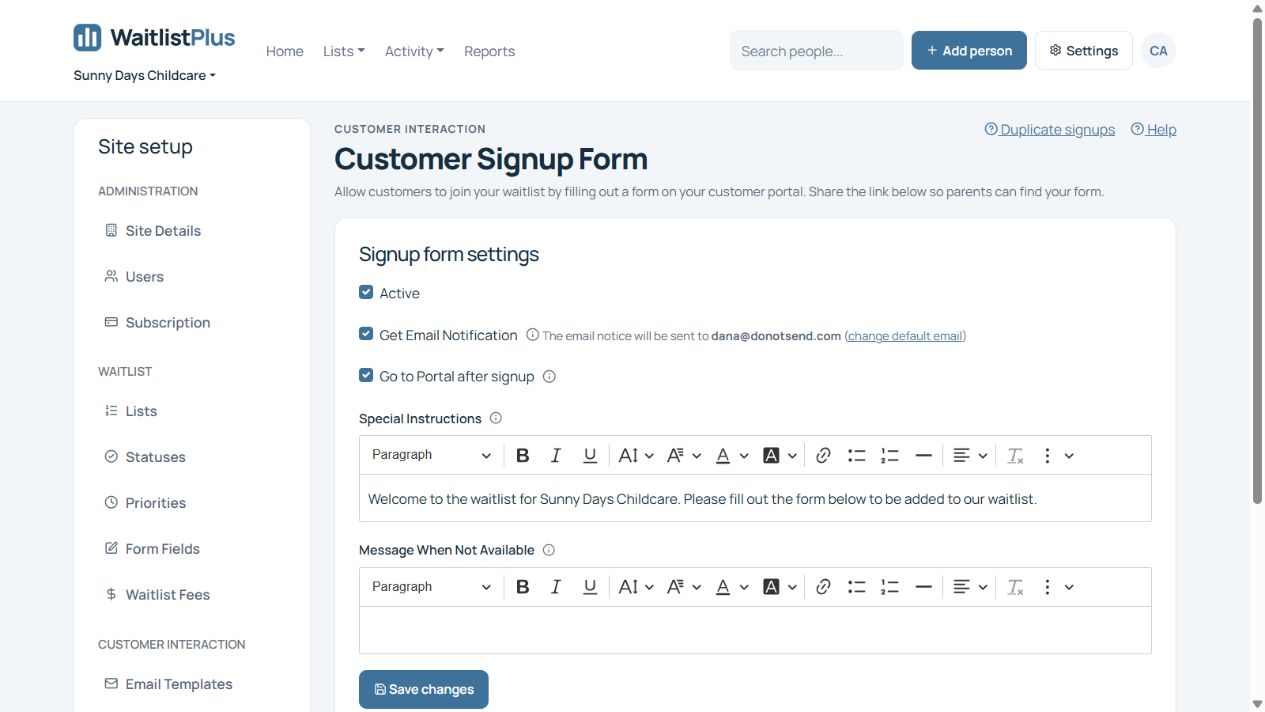
- Check the selected site, then go to Settings > Customer Signup Form.
- Review the options below, enter your instructions and unavailable message, then click Save changes.
- Check Settings > Form Fields and Settings > Site Details for the fields and family requirements described later in this guide.
| Setting | What it controls |
|---|---|
| Active | Makes online signup available. When off, customers cannot use the form. |
| Get Email Notification | Sends staff an alert after a customer completes a signup. The destination is shown on this settings page; use change default email or Settings > Site Details to change it. Alerts are sent separately for each applicant. |
| Go to Portal after signup | Sends the customer to their family portal after completion. Customer Portal must also be Active. If this option is off, the customer sees a basic success page instead. |
| Special Instructions | Optional introductory instructions for families at the start of signup. Explain what information they should have ready. |
| Message When Not Available | The message customers see when signup is inactive or the linked list is unavailable/paused. If blank, a default message is used. Include an explanation or contact details when useful. |
Choose the right signup link
Scroll to Signup form links and copy the link supplied by the app. Do not build a link by changing another site’s URL. Available links depend on your list setup.
| Link type | Use it when | Can the customer choose a different list? |
|---|---|---|
| Links for manual placement lists | You want applications for a particular manual program, such as Summer Program. Share that program’s link. | No. The linked manual list is fixed on the form. |
| Link for auto placement lists (Age or Birthdate) | Customers should join the automatic group that matches their age or birthdate. | No. The form uses automatic placement rather than a list selector. |
| Link for default sign up page | Customers should be able to choose an available manual list or automatic placement. | Yes. The form presents a list selector for the site’s choices. |
For example, Sunny Days can share its Summer Program link for that program only, its automatic-placement link for age-based childcare, or its default link when families should choose between them. Automatic placement uses birthdate and the configured ranges; Requested Start Date is a separate preference.
Choose which fields and family members are required
- In Settings > Form Fields, enable Show on Online Form for fields families should complete. Also enable the relevant person type, such as Show for Children or Show for Adults.
- Use Required when a visible field must be filled in. Required fields are marked with an asterisk (*).
- In Settings > Site Details, choose Lists For: Children, Adults, or Children and Adults.
- Enable Show Family Information to collect related people. To require an adult when a child is entered, also enable Child requires Parent.
Children and adults may see different fields. For example, a child can have a birthdate and list preference while an adult provides the family email and phone number. See Customize your Form Fields, birthdate and Trying guidance, and Prevent Duplicate Signups.
What the customer does: instructions and information
- Open the signup link and read any instructions. Use Next Step to continue.
- Enter the applicant’s information, including required fields and birthdate or Trying where appropriate. Review the list selection or assigned list and Requested Start Date.
- Click Save to save that person into the signup being prepared. This does not complete the signup.
- Use Add Person to add another family member. If an adult is required, add their contact information before moving on. Use Edit or Remove on the family summary to correct the entries.
- Check all family members, then choose Next Step.
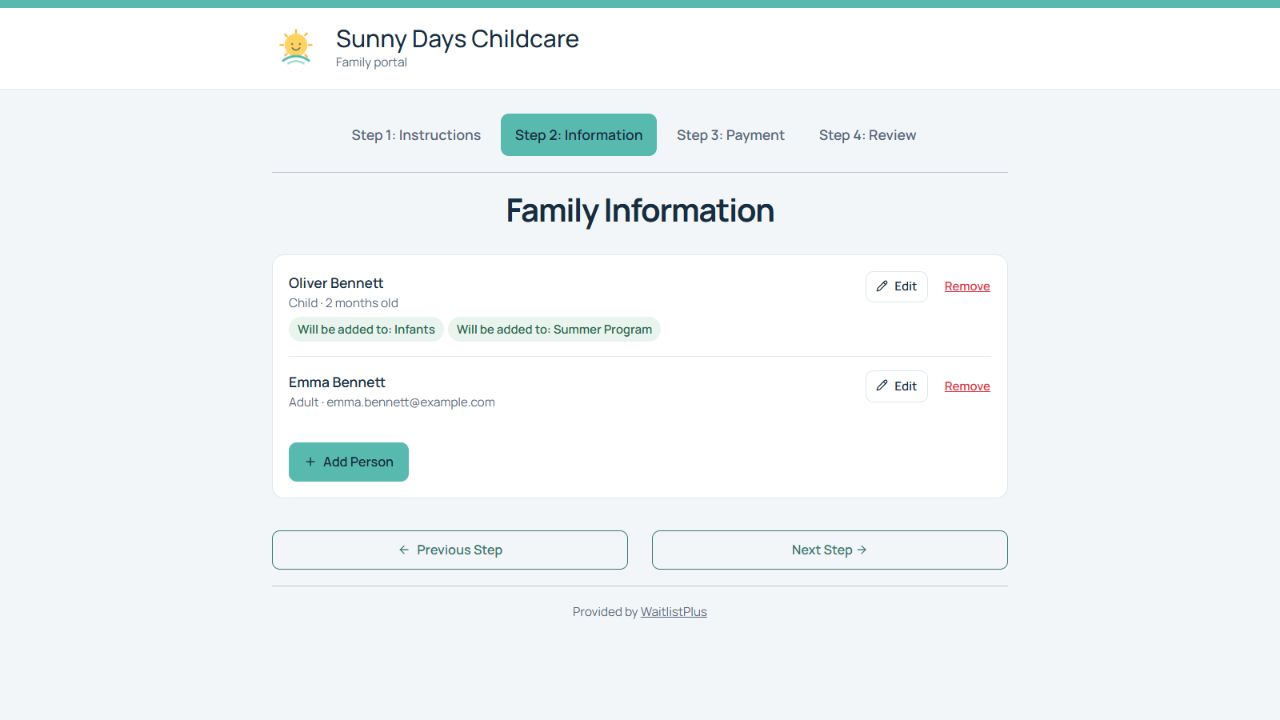
This example includes a child, a parent contact, and two memberships because multiple lists were enabled for the demonstration. A site configured for one membership shows only the applicable list. A parent added as a contact does not have to join a waiting list.
Payment, review, and completion
- If a signup fee applies, follow the Payment step. Use Enter Coupon Code if the organization has provided one, then check the resulting amount. A full waiver displays that no payment is required.
- On Review and Submit, check each person’s information, list memberships, and payment amount. Use the relevant Edit link to change a person or Change to return to payment.
- Click Complete to submit the signup. Saving a person or reaching the review page alone is not completion.
- Check the success page. If portal redirection is enabled and the portal is active, the family sees their saved details and can keep or copy their portal link. Otherwise they see the basic success page.
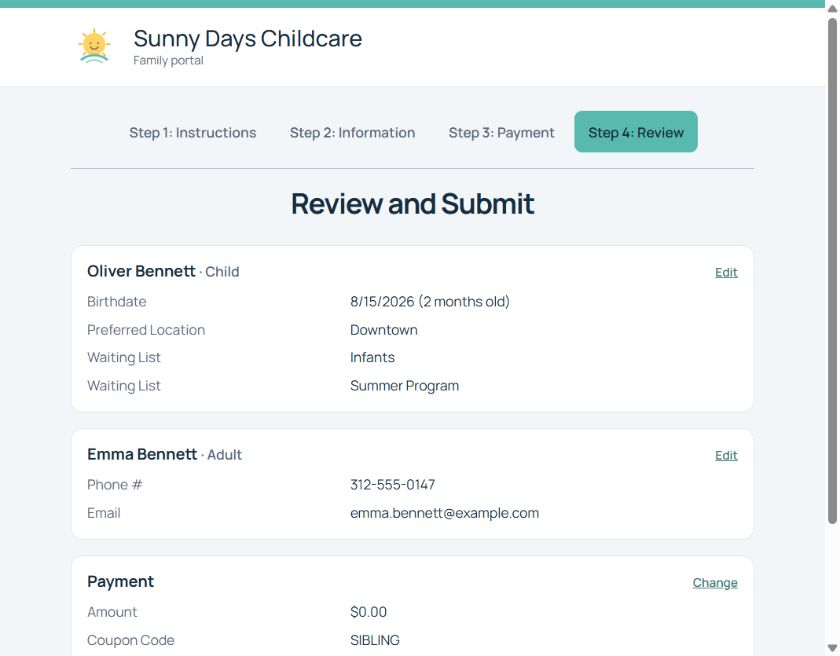
Fees and coupons are optional and depend on your site configuration. See Charging a Fee to Customers for setup. An incomplete or unsuccessful attempt should not be treated as a completed signup; staff can check for the saved applicant in the app.
Understand the two signup email settings
| Controlled by | Who it is for | |
|---|---|---|
| Staff signup alert | Customer Signup Form > Get Email Notification | The staff/default email destination shown on the signup settings page. |
| Customer welcome message | Site Details > Email Customer on Signup | The customer, using the template assigned to Portal Signup Confirmation for online signup. |
Both are sent separately for each applicant, not just once for the whole family submission. For example, a completed signup for two children with one parent contact generates an alert and welcome message for each child when the respective email options are enabled. Adding a parent only as a contact is not another applicant. See Signup Emails for templates and settings.
Test before you share the form
- Check your branding, instructions, list behavior, required fields, and family requirements using the exact link you intend to share.
- If completing a test, use clearly fictional details and an email address you control. Check notification and fee settings first so you know what will be sent or charged.
- Verify the review screen, final success/portal result, and saved applicant in the staff app. Check both the applicant and family contact.
- Publish the signup link only when the result matches your intended workflow.
Can I embed the signup form on my website?
For the best customer experience, we recommend linking to the signup form rather than embedding it. Website layout, device sizes, and browser security can affect an embedded form. A website developer may try an iframe, but WaitlistPlus does not provide support for that method.